Friday, August 23, 2013

Who can say YUM?!


A lovely recipe for homemade popsicles was posted on Facebook by a friend. Talk about YUM! Definitely has become favorite around here! I'm going to guess that purchased popsicles are going right out the door! The popsicles we buy are the 100% fruit ones and etc and those are just a bit $$. These homemade ones are even better! So...here's her recipe with the fruit we used...

1 cup water + 1/2 cup sugar heated into a simple syrup + 2 cups frozen/fresh blueberries + 2 drops lemon essential oil (1/2 teaspoon lemon extract or lots of lemon zest or lots of lemon juice subbed for some of the water would work too) & freeze.

Simple enough, yes?! Explore with Xylitol and Agave for sugar substitutes. She used Xylitol. I used Agave in one of the our explorations but the sugar in others.

    
I really didn't measure the fruit too much. Just eyeballed it. I used a Pampered Chef chopper and chopped frozen strawberries and blueberries then added them to the syrup for a minute or two. I also used LOTS of lemon juice. DELISH! Kids LOVED them! 
-----------------------------------------------------------
Another version we made was using leftover fresh mango, frozen peaches, and orange juice with a bit of Agave syrup instead of water/sugar.

The older kids liked it. I felt they were pretty orange-y tasting. So we are going to give it another go around with more fresh mango, use fresh peaches, and a fresh orange vs. orange juice and use the sugar/water mixture. FYI: This particular fruit mixture required a LOT of liquid and we had to puree it.
-----------------------------------------------------------
Then we tried cherry frozen pops also...a bit more expensive considering how much the cherries cost but...EXCELLENT!
--------------------------------------------------------------
So we are on a roll! The next double batch (because we went and got more popsicle holders ☺) is going back to strawberry and blueberry since I have lots of frozen blueberries from last year to use up.

* A few times I forgot the lemon juice. End product, just fine. :-) As an adult, I liked them better with the lemon juice...so as often as I can remember....it's getting used. Ha! *


Now....let the fruit mixture suggestions start! Comment away!

I don't purchase canned fruit often. The one type I keep in the cupboard is Dole Tropical Fruit Salad.


We eat this as a side dish, often with pizza, with vanilla yogurt and honey. The kids asked if this would make a good popsicle. Hmmm! What do you think? Anyone use yogurt for homemade pops?


Wednesday, August 21, 2013

Homemade Weather Instruments (I)

For those K12 families...these are some of what are made for Science3.  I had a 3rd grade student last year and am familiar with the curriculum and so decided early on that we were going to make these instruments BEFORE school started.  :-)  One more thing to help the 1st week or 2 of school to go a little more smoothly!  This is just three of the projects.  We'll get to the rest of them on Thurs. and Friday I hope!

Thermometers
The one on the left worked great...the one on the right...not so much.  Still haven't figured out why.

5th grader missed out on this kind of thing so he likes to join us whenever possible.  :-)


3rd grader enjoyed the process...for the most part...even if he did have to get his fingers dirty with the clay.  :-)  Oh, he's getting lots better.  Anyway, his was done "first" so he had his hands around the bottom trying to warm up the water.  The bottle began to steam up and etc but the liquid did not expand and move up the straw.  So, decided that we'd get the hair dryer out.
  
Ha!  Talk about a fast reaction.  He had it on for about 3 seconds and the liquid about came out of the top of the straw.  ☺  We did put the 3rd grader's into the freezer and then brought it out to the hair dryer and that was the one time we saw it work.  We put them up in the window sill to watch what would happen when the sun started to shine on them.  The 5th grader's did very well throughout the day...moving up the straw in the hot part of the day and down the straw when the sun stopped shining on it so much.  The 3rd grader's...nothing.  So, if it doesn't work for you...try again.  :-)
---------------------------------------------------------
Wind Vanes
 
We didn't have much wind yesterday so good that we are keeping these around for a bit.  
----------------------------------------------------------

Anemometer  
Well, this took a little more time and was a bit more difficult than I expected.  3rd grader, partly due to his personality, ended up doing very little of it himself.  5th grader was a bit more independent.  It's not all that easy to keep those straws horizontal and to staple them.  ☺


We've yet to have enough wind to "try out" our homemade wind instruments.  

 Here is another type of anemometer you could make if you feel so inclined.  It's a neat way of doing it!
Ping Pong Ball Anemometer:  http://wxteacher.com/anemometer.html
Let me know how it works if you do!
------------------------------------------------------------------


Monday, August 19, 2013

Spelling!

This post is specific to K12 curriculum for Grade 2.  However, the information can be used to spark ideas for any grade or curriculum spelling.

Tip:  Last year I really didn’t read all the details very well with spelling for 1st grade.  I thought it was pretty self-explanatory.  Needless to say, I didn’t get it figured out until MUCH later that they didn’t start spelling until 2nd semester.  Their focus is sight words for 1st semester.  Just an FYI if you haven’t gotten that far with your 1st grader’s materials.  When my 1st grader starts her spelling words, we’ll do this similar process for her also. 


Spelling Word Cards
Last year we took the suggestion of writing the words on index cards.  Definitely will do that again at all grade levels.  Partly into the year, I got smart and started writing the grade and unit number on the back of the cards.  So now I have Heart Words (sight words) and Target words (the words that follow the “rule” being taught) written out and ready to go, by unit…separated into index card holders, 1st semester and 2nd semester.  
--------------------------------------------------------------------
Last year, I just didn’t feel very organized or creative with Spelling.  All the “cute” or "looks fun" ideas really just took too long for them to do.  Our time is precious and I really needed quick and easy spelling practice.  And to be truthful, spelling came very easy for both 2nd graders last year and they often took the route of just looking at the spelling word cards “saying, spelling, saying” them.  However, this year, I know the 2nd grader has a little more difficulty with learning spelling words so I want an organized way of handling it.  This is the sheet that is printed off for him.


If this is something that works for you, you can download it here.  2 pages...with or without the 2nd grade label.  If you would like something tweaked on this page to meet your non-K12 student, feel free to send me a message.  I’d be glad to tweak it for you and email you the new document.
-----------------------------------------------------------------------------
So, what was I going for?  Short and sweet.   Something that after about a month into school, he will no longer need my instructions on what to do with his spelling words.  Variety?  How we build and what we use for sensory materials will vary so he’ll get a bit of variety.  ABC order…this is because I assumed the kiddos knew this last year and found out that most had difficulty with alphabetizing…even with an ABC chart in front of them.  So, this year…all kiddos will be practicing this weekly with their spelling word cards. 
Something we did last year that they thought was awesome (and me too…less tedious work!) was that if they passed their online review with no more than 2 wrong…they didn’t have to take their test on Friday.  It definitely motivated them to learn them.  Who wants to do spelling on “Free Friday?!”  It only happened on a handful of occasions and definitely spread out in between.  If they did not pass their spelling test…they had to practice them on the weekend and retake it on Monday.  MVCA is a "mastery required" program.  What that means is that all checkpoints, etc must be passed at 80%.

FYI:  For K12 online schools, every unit has a spelling review game online…if you are not a K12 family…you can use something like Spelling City as your online review.
-------------------------------------------------------------------------
A few ideas to get you started...

Sensory Tray Ideas
*  shaving cream
* hair gel
* fingerpaint
* salt (especially fun with rainbow paper underneath)
* thin layer of flour
* cornmeal
* sand (craft sand works best)
* playdough and letter stampers

--------------------------------------------------------------

Build and Write
* rubber letter stamps
* letter beads on pipe cleaner
* alphabet mini stickers
* letter cubes
* newspaper or commercial paper letters
* magnetic letters
* letter tiles
* foam letters

------------------------------------------------------------------------
What on earth is "Spelling Word Introduction"?
 They have Heart Words (sight words), Target Words, Alternative Words and Challenge Words.  It really depends on the student how many words you use.  I decided early on our focus would be Heart Words and Target Words.  Preferably at 1st and 2nd grade level, I didn't really want more than 10.  

On Mondays, every child sits with me and goes through their words.  I love the "Target" rule of each unit.  Actively teaching them this rules helps them learn those spelling words more quickly!  And, of course, it helps them with spelling in their general writing.  Sitting with them helps us decide just what words they'll be working with that week.

I usually let them try to spell the word on the dry-erase board.  Depending on the child, I would have them verbally spell it and I would write it on the board so they could see it.  We focus on the spelling rule...finding it in every word and so on.  Then we sorted the spelling words...

I already know these.
These are a little more difficult.

If they hesitated in spelling, it went into the "little more difficult" pile.  That gave us our main chunk of spelling words for the week.  Sometimes I pulled in the alternate or challenge words, sometimes I didn't.  

-------------------------------------------------------------
I'd love to hear how others go about helping their kiddos learn their words!  3rd grade and up have an activity book to go with their words.  My 4th grader last year did NOT like it at all...but mom did. ☺  Yes, it took a little longer time to get through spelling but it went beyond rote memorization.  And as long as he used the "say, spell, say" technique every time he wrote the word down for an answer...he passed the tests just fine.  When he didn't...no, he didn't do well on his tests.  The older kiddos are more than welcome to use the letter builders and sensory tray that is available that day/week if they wish to ALONG with their activity book.  ☺


Thursday, August 15, 2013

K12 Language Arts, with a focus on Grade 1.

I've been working, off and on, trying to "getting ahead".  Many people have asked me "How much prep time do you plan for?"  I hesitate to tell them just how much prep time I put into this schooling at home.  I really don't want to discourage them.  I know that I don't fall in the "typical" category.  You can definitely use K12 curriculum as it is and your student will do just fine.  However, I do have a bit of an educational background and this type of thing is something I've always enjoyed doing.  I tweak things all the time.  :-)  
-----------------------------------------------------------
 I've always been big on preparation...that's what works best with my own personality. 5-6 kiddos in a small house...it's necessary.  One thing that I found last year was that if I wasn't completely prepared we didn't go into details as much as we could have...especially in Language Arts.  I'd get an idea in my mind and then wouldn't have time to really do it right at that moment...then forget it...we never got to it.  Sound familiar? 

Another thing that I confirmed was just how much younger children are visual learners.  I found with K12 LA, there was a LOT of talking on my part and a lot of listening on their part (especially with LA2, which LA1 takes the same format this year) and so I would find myself grabbing the white board and drawing out a thinking map or something to that effect.  However, that isn't my favorite route to go because plain and simple...I have bad penmanship...especially at a white board!  And really, there wasn't an easy way to document everything we did.  

  
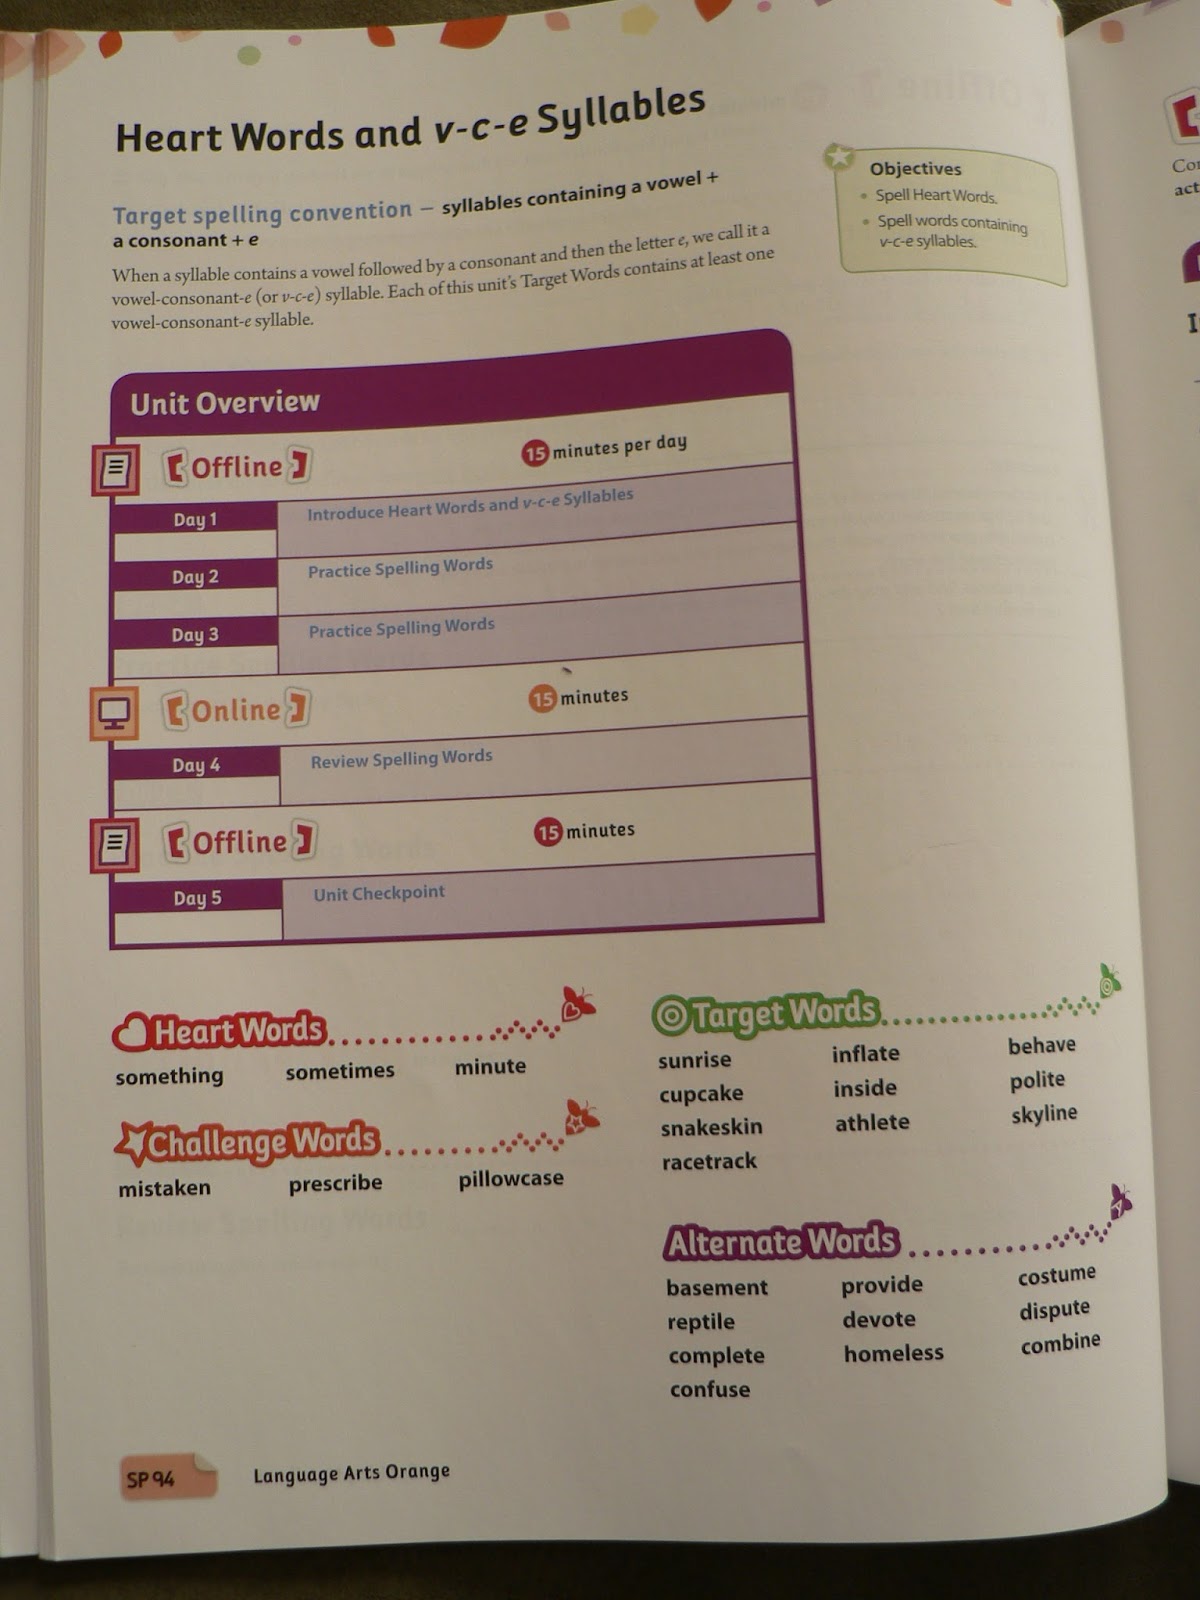
As I was going through the awesome new Language Arts 1 Lesson Guide, it reinforced that I wanted to do things differently...be ready for the visuals...have as many as possible right there at my fingertips.  Nothing fancy...just have the stuff ready to go...then we also have documentation of what we did.   So I started going through the lesson guide asking myself, can I turn at least one of these activities into a visual.  You bet, most times I could find multiple ways but I didn't want to overwhelm myself or the student so I tried to limit what I prepared.


Yes, there are post it notes all through to the mid-semester checkpoint, that's how far I got yesterday.  :-)  Reminders to me of what I had prepared or notes about art projects we could do along with it.  I've got a good portion of 2nd grade done already also.  Haven't received 3rd grade's yet...I hear it might be a new "course" and that is why it's being held up.  We'll see.  Once I get everyone prepped up to mid-semester I'll start going at it again and go to semester, etc.

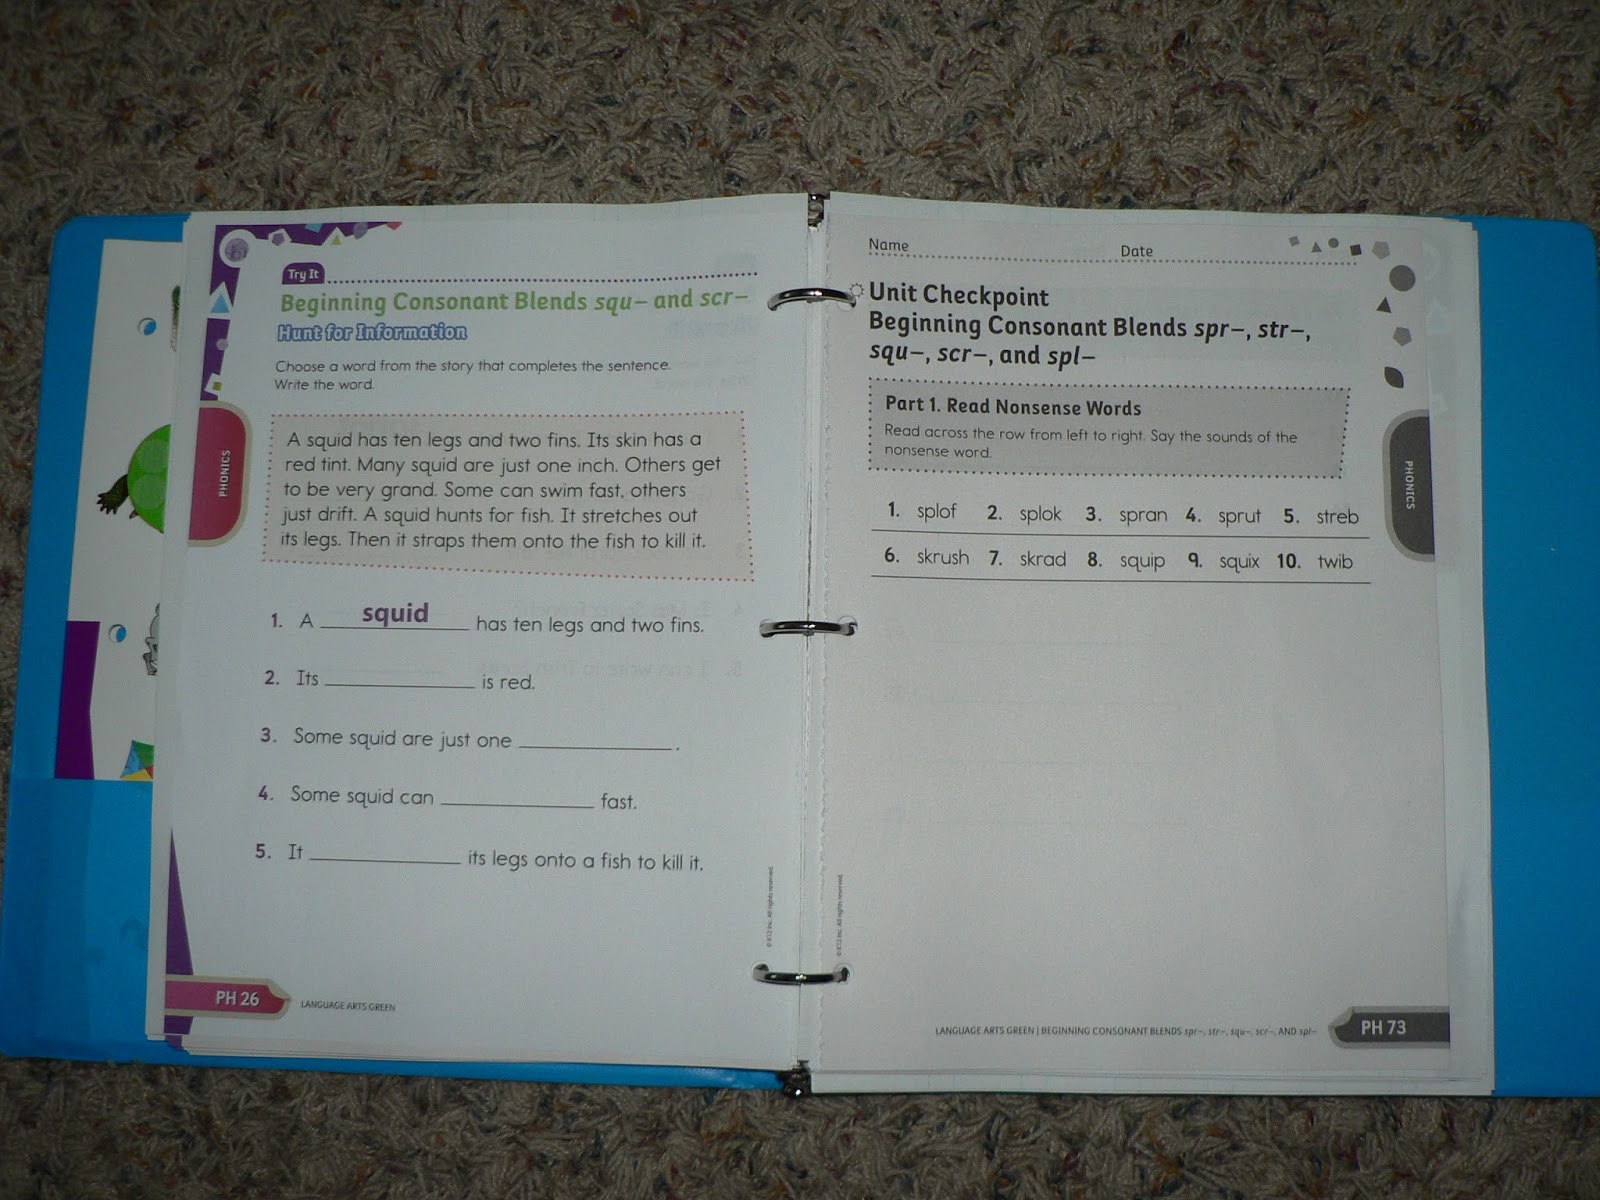
I had already decided to do the "binder route" with Language Arts for 1st and 2nd grade.  No loose papers!!!  Everything right ready to go.   This allows for us to go back and look at past materials with out searching through the filing cabinet.  ☺ This works well for putting in some "extras".  I just hole punched and pop it at the correct spot in the binder.
So my own "creations" plus the pages from the Activity Guide.
Repetition is so necessary at the younger grades that this one thing I love about the new LA1.  They definitely repeat information from one lesson to the next...not in a tiring way...just frequently enough that the children are getting "review".  One aspect of reading comprehension they are doing a lot of is "making predictions".  I made a page similar to the one on the left above for each book.  They ask us to "jot" down the child's predictions at certain spots in the book and later refer back to them so why not have it in an organizer.  It's a great way to reinforce that sometimes our predictions are incorrect but that is okay!  For K12 individuals, I have a picture for each book they ask us to do this prediction activity, up to Mid-Semester checkpoint...I also included a blank page for those that may wish to use this very simple prediction page with a different book.
You can get it HERE.

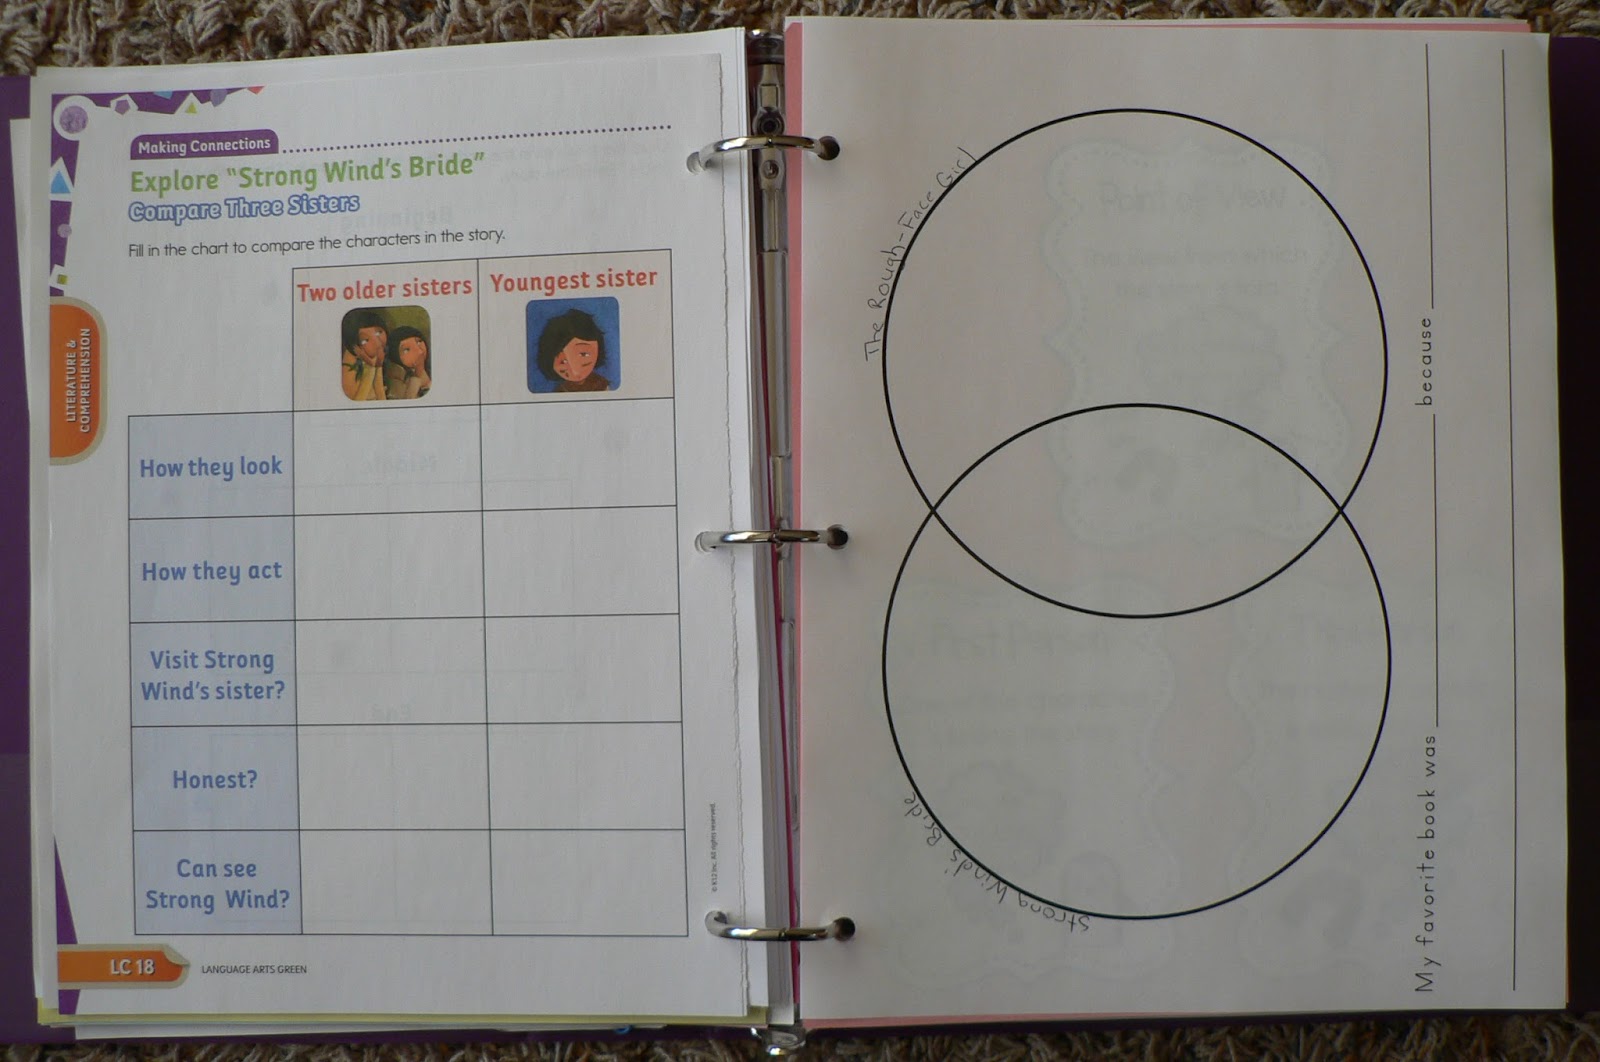
Another "repeat" activity, compare two books.  These are actually optional activities throughout the book, but I like them and I have found that most of the books they suggest we get from the library can also be found read on You Tube so that's the route we'll go.  The venn diagram organizer can be found HERE.  I added a spot for her to complete the sentence "My favorite book is _____________ because...."

 
Another thing they do is have us copy a poem on a white board or sheet of paper and discuss the specific structure and such of it.  It makes sense to review it before we start into the actual lesson.  They want us to find the rhyming words, talk about stanzas, where's the repetition, personification, etc.  Again, my handwriting is awful and really, I don't have the time during a lesson to do copy a poem on the whiteboard so I'm preparing these by typing the poems up and printing them.  Then the child can use highlighters, colored pencils and such to find the parts of the poem they are asking and most times I'm leaving white space so we can add stickers, drawings, or fingerprint animals around them.

Making Inferences printable was shared by Tales from Outside the Classroom.
There are a few verbal activities where we are asking the children what they think about certain parts of the story.  They are encouraging the children to use text clues and their schema (own knowledge) to come up with an inference.  Here I jotted down on a half of small post-it the question, etc and placed it in the My Inference column.  Yes, written pretty small but that is for me to remember what questions I wanted to be sure to ask.  :-) We can lift it a bit and write their conclusion down and also fill in the chart with what the story said/showed and their own knowledge.

Up to Mid-Semester Checkpoint, lessons titled
Introduce The Woodpecker, Turtle, and Deer
Introduce Stone Soup
Introduce Budulinek
Introduce Issun Boshi

The kids and I worked with "inferring" a lot last year and it made a big difference in their ability to "think through" things in their practical life.  Can't say they really spend much time on teaching what schema, inferring, etc really meant at our brick and mortar.  I think it must be a Common Core thing.  I expect they'll be doing more of it.  That's one aspect of Common Core that I like...LOTS of active teaching of vocabulary!

I do a lot of "prep" work but I do very little creating on my own because 

1)  there are many resources online.  Awesome teachers that share their hard work for free!  Why recreate the wheel?

2) I don't have access to the clipart and such to make it "cute" like I typically like.  :-)

But, mainly, why make more work for me? Pinterest and Teachers Pays Teachers are where I go to first when I'm looking for something in particular.
They really only introduce 1st person point of view with 1st and 2nd graders but never have I had a conversation with the kids that only included 1st person.  We almost always put an example of 3rd person in there...mainly because I have older students here also.  So this is a very sweet and simple poster set shared by The Idea Gal.  

Tip:  print them smaller than full page to save on ink.  It's perfect for 1:1/homeschooling/binders, etc.

I printed a LOT of posters and etc.  Why?  Last year I ended up printing them and then we set them down and they got misplaced and then I wanted them again.  Visual reminders for the kids.  This way we won't lose them!  They'll be right in the binder and we can go back whenever the kiddos need a reminder of a definition or a technique.
Another example of posters printed smaller than original document to be put in a binder.  In LA1, they spend a good portion of the time retelling a story.  Having a visual makes retelling a whole lot easier.  This poster set was shared by First Grade Wow.  She also provided pieces you could laminate and slip onto a piece of yarn or string to make a personal retelling rope.  :-)

All grades work on the Story Elements at different levels.  One thing I learned was that I could not assume they knew something.  :-)  This year I'll have a sister/brother combo for 1st and 2nd grade.  They will cover some of the same things so I wanted something "different" for each one.  This was easily made possible by the abundance of free posters available!  This particular poster set (printed 4 to a page to get this size) was shared by Ladybug's Teacher's Files.

This is a very simple page that will be a "work in progress".  Poetry/Figurative Language Vocabulary posters.  I printed 16 to a page of this poster set shared by Everything Just So's TPT store.  Very simple definitions of vocabulary they teach regarding poetry.  Though I'm not a big poetry fan, personally...I love how much poetry they are introduced to!  We will cut apart the ones we learn and glue them to the paper as we learn them.  Then we'll come back to this page if we get stuck on what something means.


Anchor Charts
These are "BIG" in the elementary classroom these days.  I LOVE them!  Goes back to how many kids are visual learners!  However, I do not have the time or the ability to make awesome anchor charts for the kids and yes, I cheated a bit...some I just saved image and added it to a page, similar to above, with the wording and "tips" that K12 use in their lessons.  This is for personal use only.  The Prediction Anchor chart example was shared by Stories From Second.  However, I can't find it when I look for it.  This was a Pinterest find.  

Another example of "cheating" and just printing the person's picture...again...please don't claim the idea as your own if you do this!  Don't want to get you in trouble!  

Alliteration anchor chart was just a picture...so I can't give credit to who it belongs too.  :-/

I added the little alliteration sentence that they use in the lesson so she can highlight the s's.


Fact vs. Opinion VERY CUTE anchor chart :-)


--------------------------------------------------------

This is hard to see but it is a simple foldable I created when I couldn't find what I wanted.  It's for the cause and effect activity during the Sylvester and the Magic Pebble lesson.  I actually took pictures from the book as visuals for the "cause".  Obviously this is a work in progress.  She'll cut the top layer on the line to make flaps and inside she'll right the effect of what happened and perhaps draw a picture.  This was a verbal "ask question" activity.  This makes a nice way of remember what we did as there is nothing in the activity guide to go with the Sylvester story.  :-)    Here's a little closer up of it...
You can get it HERE.

Before we get into the actual Cause and Effect of the lesson, we'll go through a bit of another packet a teacher so nicely shared!  You can find this one at Mrs. Patmore's TPT store.  'Tis free!

A few other simple printables that go with LA1.


Up to Mid-Semester Checkpoint
Can be used with lessons titled:
Explore Bedtime for Frances
Explore The Legend of the Bluebonnet
Explore King Midas
Explore Strong Wind's Bride
Explore Stone Soup
Explore Issun Boshi


Used with lesson titled, Explore Table Manners


Some of the other freebies I'll have in the binder available to us because of some wonderful teachers willing to share their hard work.  :-)


A simple sort for beginning of school year.  They can "INFER" what will be a fiction book and what will be a non-fiction book by the pictures and title.  :-)  This freebie was shared by Second Grade Freebies.

Non Fiction Text Features
Shared by Primary Punch.
I like these because they are simple.  In the packet you get 16 feature posters!  I printed them 9 to a page and will be laminating them an putting them in a pocket inside of the binder.

 We are looking forward to a lovely school year...hope you all are as well!


Thursday, August 8, 2013

Melissa and Doug Money Tray and Making Change Technique


This is one of our Amazon Point Goodies for the school year!  :-)

We are SO SO excited!

C. used it with his Summer Bridge work yesterday morning...it was PERFECT!
The bills go up to $100 and the coins go up to 50 cent pieces.  
There are plenty to work with.  I love the wooden storage and in each section it is printed what goes there...so nice for the younger elementary kids.

Relatively "life size" bills and coins too...which make it really nice!

In the picture above with C., you'll notice a little technique that I started using with C. to figure "how much change".  It goes back to the Part-Part Whole concept taught in 1st grade math.  :-P
Several of these simple mats can be found at Teachers Pay Teachers for free.  :-)

C. first put how much he owed on the left.  Then across the top and sideways he put how much he gave the cashier (the whole).  Then he had to figure out the other "part"...how much change would he receive.  He's a very visual kid so this made learning how to make change really easy after he "got" the concept that you work with the biggest bills first!  ☺

A down side to this tray is there is no top.  Hmmm, and it's bigger than a 2 gallon storage bag which I usually use for toys like this.  Oh well, I figure it will probably be out most of the school year anyway and shouldn't be too much of a hassle.  

We do have pretend money for "play" so I'm going to do my best to encourage them to use this particular tray for math time and hopefully it will last us for many years.  :-)

Wednesday, August 7, 2013

Yes, I'm the Queen of Binders...

Even if some of the rows are doubled and these aren't even all of the binders...I know I'm probably not quite the "queen". Ha!  I'm sure there are many a teacher...and especially a homeschool parent who uses them just as much as I do.  These last couple of weeks I've been able to do a lot more organizing with my binders.  Yesterday I had an appointment that the kids couldn't go with me on and so when I got back home, my eldest asked what I got at the store. (We live in a rural area so if I have an appointment...yes, that turns into a shopping day also as it takes many miles/minutes to get to most anywhere.)  Then he got this little smile on his face and asked, "Binders and sheet protectors?"  Tee hee!  Yep!  

That's just a selection of yesterday's.  ☺
-----------------------------------------------------------------
I've never been a huge fan of worksheets, especially with preschoolers, but not a whole lot with elementary kiddos either.  However, after a year of having the kids home, I see and understand why many teachers fall back on worksheets.  They do have their place.  Here is my opinion as of now...

Worksheets and workbooks are suitable for some situations and children and not others. 

Phenomenal thought.  :-D  There really are some kids that love worksheets!  There are some that hate them.  Use them accordingly.

-------------------------------------------------------------------------------

I have used binders for worksheets and workbooks for years!  Dry erase markers work just fine on most.  If it's a sheet that dry erase markers do not work on, I can copy the page and stick it in the page protector and they can use crayon/pencil.  FYI- I try to print the copies of these sheets on different colored paper so they don't use my master on accident.  Saves paper, dry erase markers are loved by most all children, the binders can be used with multiple children.  Ideal for homeschooling especially!
This is Kumon book I trimmed to fit in. Great "World" mazes for the older kiddos!  Binders work awesome for mazes!  No waste!  Can use it for every kid in the family...I've seen classroom teacher use it this way also.

    Work great for word searches also!

And this is a perfect approach to this particular step by step drawing book!  The nice thing is that they can erase all those extra lines quite easily!  ☺

-----------------------------------------------------------

I'm also a big Mailbox fan.  ☺  Love them!  

Been a subscriber for years for preschool and kindergarten.  I don't subscribe to the elementary ones as I can get them at the library with no problem at no cost.  ☺

Well, before 2 of the kiddos got enrolled in MVCA last year, I had to plan that they wouldn't get enrolled and we'd be coming up with our own plans.  So Mailbox was one of the first places I went to. During that time, I purchased some independent work and center books for elementary.  So last year they got used...............very little.  Ha!  They are NOT going to go to sit on the shelf and collect dust this year!  One of my concerns last year was they weren't getting enough "review".  We were learning a topic but weren't doing much with it after the fact.  So this year I have created independent work binders out of all those Mailbox books I had purchased.  I'm quite pleased!  I also had some older workbooks so even the 1st grader has some independent review work binders.  My main two subjects that I wanted to review were math and language arts.  So here is what I did.
 Upper elementary Language Arts and Math Independent Practice.


3rd Grader's math review

Everything he needs for each 'center' (that is not an item we keep out regularly) is in the sheet protector for him, ready to go.


Grade 3 Language Arts Practice Galore
Prime example of using "work sheets" in a binder.  In the right picture is an example of a page that he would not be able to use the markers because it's a color code activity.  I will copy that page one a colored paper, so he knows which one to use, and slip it into the page protector.  It's not a good thing when kids use your masters!  ☺
  
Non-Mailbox review for 1st grader :-)
 
Below is the little "self-evaluating" tool I'm going to try out with her.  She can put the paper clip on the page she did that day, color depending on the difficulty level, and then 1) I know which was was done that day so I can check it over and 2) I know what she thinks about the work. 
I'm going to try this....they open the binder, pick one of the activities on that spread of pages to do.   This way they are working with a variety of activities without me having to plan it out specifically.  I already went through the activities and know they will be review for what was introduced already.


Many of these word puzzles go right along with PhonicsWorks1 (K12 curriculum).  So that is quite nice!


Yes, I noticed I did not have any pictures of the 2nd grade binders.  Ha!  Wasn't intentional.  Just snapped a few pictures and didn't think you'd want to see ALL the binders.  :-D
----------------------------------------------------------
Another task I got accomplished this summer was to get ALL of the Draw Write Now books into binders.  This year they'll each get one binder to work through vs. me trying to match topics.  

Book 1          and          Book 8
of the set that you can find at Amazon.  You can purchase them individually also.

Above:  a spread of pages from book 1.
Below:  a spread of pages from book 8.
 We use the concept of HWT's lined paper.  Here is the printable if you want to use it too.
Draw Write Now Writing Paper
 

I use the Draw Write Now series for all grades.  At the K/1 level, I suggest they use it as copy work.  And grade 2...that depends on the kiddo.  This year, he'll probably use it for copywork also.  However, last year I gave 2nd graders a choice on whether or not to create their own paragraph or do it as copywork.  For grades 3/4, we use it for cursive practice....so transpose the paragraph to cursive.  And for 5th grade...it does seem really simple for them...but he loves the drawing part and we are going to use it for typing practice.  ☺
-------------------------------------------------------
 This year I am using binders for 3rd grade science so he has something to share with the rest of us and get some practice with presentation.  I also used binders last year for history.  They LOVED going back and seeing their past work all in an organized fashion.

Anyway...I have "extras" as well as Science 3, K12 activities all in the binder.  Each unit correlates with the K12 unit. 

In the left picture is a page protector with materials and instruction to create a project I found at...
Shenigans in 2nd Grade.
We'll use his own picture for the face like she did here.  :-)

--------------------------------------------------------

This year, especially with 1st grade, I'm trying to keep ahead of the paper disaster and Language Arts and PhonicsWorks are in binders for the whole year already.  Activity pages, checkpoints, and any extra papers we'll be needing.  No time wasting with trying to find the paper I had ripped out at the end of the week before to PREP for the week and giving up and having to go  print another copy.  No more running around trying to find out where the lined paper got put the last time someone used it.  No more spending hours trying to organize piles of paper because I ran out of energy and let the basket overflow with 6 students' work.  Ha!
-------------------------------------------------------------------

I also use binders for all my teacher reproducibles I've collected over the years to make it very easy to select the one I want and make copies.  Many many books have been broken down (or as my husband puts it "destroyed" ☺ and put into binders over the years.  It works for me!